This weekend in Aberdeen was really quite grey and wet and miserable, so I decided on Sunday that I was going to bake a cake with a difference after being inspired by this blog post. I didn't read the blog post until a bit later but the image of the cake popped up on my facebook page and thought it would add just the right amount of colour into my weekend!
I would like to point out that my cake did not turn out as intended but it was still yum, so a win really! Haha!
I started by making the batter from my coconut recipe as detailed here, this was going to be for my coloured cake balls.
I then split the mix into five seperate bowls, added some food colouring and mixed it well in.
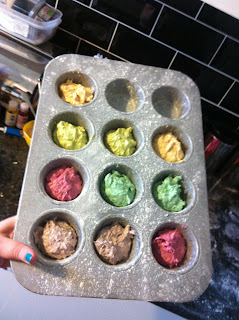
I didn't have a cake pop baking tray so I thought I would just make individual cupcakes and trim them to size, so I used my pastry/basting brush to grease a baking tray with butter and then threw sifted flour over it. You can buy the silicone cake pop trays off of the likes of ebay and amazon pretty inexpensively.
I divided the mixture into the baking tray using an ice cream scoop.
How pretty does that baking tray look!! haha!
I baked them for about 15 minutes, until a cocktail stick stuck in the centre came out clean.
While they cooled, I made the buttercream icing, again like the one for the coconut cake (without the coconut) and added a teaspoon each of vanilla essence and blue food colouring - my other half picked the blue!
I used the excess batter to make a wee rainbow layered heart cake for the Mr.
This is where I forgot to take pictures, silly me! I trimmed the cupcakes down to kinda ball shapes but was a little bit gutted that the colours were not very vibrant, the blue looked green, the green looked yellow, the purple looked pink, the pink all rose to the top and the yellow wasn't even visible!
I made a vanilla sponge batter, which is just the coconut sponge recipe without the coconut and a teaspoon of vanilla extract. I put a thin layer over the bottom of a greased and floured cake tin. I used a square one as I thought it would be fun against the circles in the cake, but a 9"/20cm round sandwich tin would be fine.
On top of the thin layer, I placed the cupcake balls and then poured the rest of the batter over the top making sure that each ball was well covered.
I put it into the oven at 180 degrees C (fan assisted) for about 30 minutes - again, keep checking with a cocktail stick on knife, when you stick either one of those in the centre, they should come out clean, if they come out and they have mixture on them it means that it is not cooked through the middle.
Et Voila!!
Leave for 5 minutes in the tin to cool but do take a knife round the edge to loosen the sponge. After this, place on a wire cooling rack until completely cool and then decorate 'til your heart is content!
I hope you like and that this maybe inspires you,
Do you have any recommendations of vibrant food colourings?
Hugs,
Jodi
xxx


No comments:
Post a Comment