Showing posts with label Sally Hansen. Show all posts

Sunday, 16 March 2014

Weekend Mani #24

Woah! That weekend passed mighty quickly, I hope you had a good one!

Following on from last weeks poundland bargains, I have another £1 polish on the blog for this weekend.

Meet Sally Hansen Sugar Coat in 'Bubble Plum'


So first off, the colour, although the name 'Bubble Plum' doesn't quite roll off the tongue, it describes this colour perfectly.  A gorgeous mix between bubblegum pink and a plummy purple, it has a not quite neon 'glow' about it.  I'm in love with this colour.
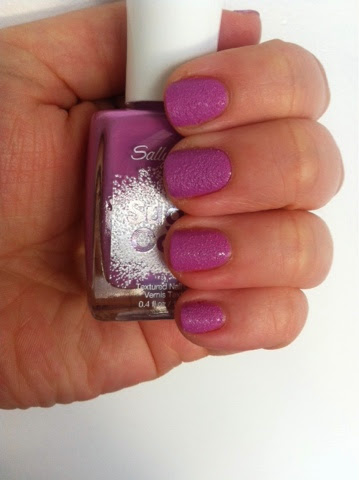

This is Sally Hansen's foray into textured polishes and there is actually a large shade range of these and they vary between one colour matte shades to others with glitter and sparkle and all sorts.  I now have six in my collection, two of which have that extra sparkle dimension.   

These are really textured, almost  too grainy like for my tastes but that may also be because there is just one dimension i.e. just one colour, to this polish.  a bit of sparkle and this could be quite similar to 'My Current Crush' by O.P.I , see here.


The bottle says to apply two thin coats and I readily agree with that, I don't think you would get away with just one as it is quite a thin polish and also has quite a thin brush.  It dries relatively quickly and has lasted 36 hours with only minimal tipwear.  This is designed to be worn without a topcoat, which I particularly love as I do love me a bit of matte.  This isn't completely matte however, it does have a bit of shine and without a layer of topcoat, it is much easier to remove - bonus!!

For £1 at poundland, I would definitely recommend this if you are a fan of textured polishes.  The colour is lovely, it is very textured and dries quickly.

Hugs,

Jodi

xxx

Friday, 27 December 2013

Weekend (ish) Mani #18 and a How To!

Merry Day After Boxing Day!

Have you had a look at the boxing day sales yet? I've ordered a few bits and bobs and so will post about them very soon!

My Christmas Day Mani was a bit of a quickie one, we were doing the cooking and prep etc for 11 or so people and so it was very, very busy!

I have made this into a wee tutorial type post too, since it's Christmas and all that jazz!

I have a multitude of different pictures too as my iPhone storage is kinda full and I still haven't figured out how to work my coolpix that I got for my birthday in July!


This mani was pretty simple, I was rather rushed and this was the only thing I could think of that didn't require too much effort (or thought!) on Christmas Day.


Here's the tools I went for: a selection of polishes, a topcoat, thread, scissors, dotting tool and a plastic tray thing for splodging my polish into.


After I applied my basecoat, I applied two coats of OPI 'I vant to be a-lone star, I love this for this particular mani as it is a frosty pale blue with a silver shimmer.  Some of my nails needed a third coat as there were some patchy bits.

Before adding the second coat, I cut the thread to size in preparation for the next step.


After adding the second (and third) coats of polish, I applied the thread to my nails before the polish was dry.  you can apply it in anyway you want, I quite like the loop on my pointer finger!

Use tweezers or the scissors to gently push the thread into the polish so that it adheres to the nail. 

I then applied a coat of topcoat just to seal it all in.

One thing I did forget which would have been really handy for while doing my dots would have been a cotton pad with nail polish remover on it to wipe my dotting tool on after each colour.


I then splodged my polish into the plastic tray, I started with yellow and did all the yellow dots on every finger before moving onto all the blue dots, then all the red dots and then all the green. 

The yellow I used was the Barry M Limited Edition Yellow I posted about here.


The blue I used was Nails Inc. 'Baker Street' quite possibly the bestest blue colour in the world ever!! I posted about it here too.


The red I used was the Mavala Rouge Rubis one I used last week, here, is a lovely little red.  I can't believe I have owned this for a whole year before using this, it really is a lovely, sparkly red and perfect for Christmas!


The green was a cheeky little poundland purchase but I really like the metallic effect.  It is a Sally Hansen Ultra HD in shade 'Resolution'. I have only ever worn this on my toes and although the colour is pretty lovely, the formula is quite thin and needs quite a few coats for opacity. 


I waited (not so) patiently for the polish to dry, trimmed the thread and then topcoated again just to keep it looking nice and shiny throughout christmas dinner!

This design could have so many variations, you could do a darker base or a glittery base, switch up the colour of the thread and silver and gold dots would make awesome fairy lights! 

Let me know if you give these a try, these would work well for New Years Nails too!


Hugs,

Jodi


Sunday, 1 September 2013

Weekend Mani #2

The Sun has made an appearance this weekend and so I fancied a nice, cheery nail to celebrate! 

You may remember that very recently I made some Barry M purchases, I posted about them here.  I have used the matte white as a base on my accent fingers, O.P.I Shorts Story (please do shop around for this!) for the other nails and some polka dots and the Ltd Edition yellow by Barry M for some extra dots.  I do like polka dots! 


Application was easy breezy, I used Sally Hansen 'hard as nails' as a base coat and two coats of the base colour on each nail.  I'm not really too fussy about base coats etc at the moment as my nails only have to last two days at the weekend, I like the Sally Hansen one as it's actually really easy to pick off, tut tut! 


To jazz things up a bit, I decided to try a matte finish.  This is just a cheapie I got from George at Asda. It's not great and if the polish is applied too thickly, it doesn't really go particularly matte.  As I say, I only wear this for two days and so can't really comment on durability.  I would also imagine it is harder to wrap the tip of the nail with a matte polish.  That's maybe an idea for a future post! 


Are you doing anything nice this weekend?

What is your 'go-to' nail art? 

Hugs,

Jodi
xxx

P.s. please excuse the cut on my thumb, whoever thought a double edged serrated bread knife was a good idea has a lot to answer for! 

Wednesday, 28 August 2013

Weekend Mani

I was given a new nail polish by one of my lovely work chums and couldn't wait until the weekend to try it out.
Introducing Sally Hansen's 'fuzzy coat!' 

Similar to Nails inc. feathers, the fuzzy coat contains strands of different colours suspended in a clear base.  The colour I was given was 'all yarned up' however, I believe there is 8 different colours in the range.

As soon as I saw this, I automatically thought of 'Porchester Square' a gorgeous Nails Inc, neutral shade, marketed as one of their hero shades.  These two polishes together give an otherwise very grown up mani a fun twist.


When I was shopping for my mum's birthday, the girl behind the counter at the jewellers even commented on my nails! 


When I was passing through Boots - it was a shortcut, I promise! I came across their new nails inc stand and couldn't resist a comparison.  This is 'All yarned up' next to 'Chester feathers', they are very similar! The Nails Inc has turquoise-y type strands as opposed to the blue in the Fuzzy coat.  

Application was pretty good although I do find the strands a pain on the end of the nail, if they hang over at all, they can catch and chip very easily.  Once applied the texture was pretty smooth, a coat of seche vite settled any bumpy bits.

What I really like about this is that it is a trend that all ages can wear, the recently retired secretary from my work came in with cake and she was wearing the Nails inc feathers! 

I'm intrigued to try the Bourjois laser toppings now.

Have you tried any of the feathers effect polishes? 

Hugs, 

Jodi
xxx