Saturday, 22 February 2014

Nspa Thai Spa Rituals Scented Candle - A Review

At New Year here in Aberdeen, we indulge in a tradition known as 'First Footing'.  Usually it would be something like a bottle of booze or a box of chocolates but this year my mum gave me this candle instead as she knows I'm not much of a drinker and chocolate was on the naughty list... yeah, was...

The brand is 'nspa' and is sold at Asda.    


The candle is part of the Thai Spa Rituals range and is a Frangipani and Coconut scented affair, with essential oil of jasmine, tuberose, gardenia, sweet orange blossom and amber woods.

Very pretty box and the candle was well wrapped in tissue paper.  The candle holder itself is a nice white, frosted glass container.  It is not particularly cumbersome at 180g but should give around 30 hours burn time (I always find these estimates optimistic). 


Truthfully, of all the scents listed above I could smell none! I'm a big fan of anything coconut so was really looking forward to it but I couldn't even detect a hint of it.

It's a pretty offering and if you are looking for something cheap that lights up, it serves that function very well although I did notice that straight away there was a pretty impressive 'well' round the wick and that didn't disappear after a few hours burning.  If it is strong scent throw that you are looking for, I wouldn't recommend this.

All in all, a pretty and inexpensive gift for yourself or someone else to light whilst in the bath but it won't have you lying there thinking of tropical beaches and men in trunks serving you pina coladas... sigh

Do you like candles?

What your favourite scent?

Hugs,

Jodi
xxx

Thursday, 13 February 2014

Chicken Parma Pesto - Sunday Scoffing!


*** VEGETARIANS LOOK AWAY NOW, THERE ARE PICTURES OF RAW CHICKEN ***


This is something I rustled up a few weeks ago and it was rather tasty and it felt like I had done some 'proper' cooking!  This is a rather picture heavy post, just sayin'...  

Wednesday, 12 February 2014

Bobbi Brown Long Wear Even Finish Foundation - A Review

A while back now, I decided I would splurge on some higher end foundation than I would usually use in the battle against my face! So I headed straight for the Bobbi Brown counter as, although I have lusted after many a palette and shimmer brick from the brand, I have never actually bought anything from them.
  

I was served by Heather at the Bobbi Brown counter in John Lewis in Aberdeen and she was really nice and made me feel really at ease.  I had originally asked for a sample as I wanted to test coverage and longevity of the foundation whilst working in the hospital, where it can get really warm!  Heather told me that they don't give out samples and that they colour match their customers there and then, and that's what she did.  


The foundation I was interested in was the long wear even finish foundation and Heather removed my make up, cleansed my skin and applied primer and all that jazz before applying the foundation, it was the first time I have ever had my make up done and it was really nice! The foundation itself has good coverage and although it is oil-free, the finish is not cakey.  Heather matched me to the shade 'Warm Sand' which I initially thought would be way to dark and yellow for me.  Bobbi Brown base products do lean towards yellow, as Bobbi (said like we are bezzies!) believes that the yellow helps neutralise any redness.  While I think there is definately merit to that, if the shade is too dark, it's going to look very odd.

In the shop, I was sold, it covered my blemishes pretty well although Heather did also apply corrector, powder, blush etc. and the finish was rather glowy.  However, as usual, when I got out into daylight, I wasn't happy with the shade.  As it was too dark, the difference between my face and my neck were glaringly obvious.  I think in store this was hidden a little bit by clever application of bronzer!

I would definately try this again, but I may just order online, looking at the delivery and returns section on Bobbi Browns website, it does state that where base products such as foundation and corrector are concerned, they will accept them back if they have been tested.  Obviously, if you use half the bottle, you are not going to get your cash back!  

It is also an SPF15 so as always, something to consider if you are going to be in the midst of flash photography.

I also got some cute sample of skincare and mascara (which I haven't tested yet) and should also mention that the Bobbi Brown brushes that Heather used were really soft.

Have you tried any Bobbi Brown products?

Hugs,

Jodi
xxx

Tuesday, 11 February 2014

We're All Stars!

So I promised a wee tutorial on how I did my starry nails and here it is!

First things first, if you are using a base colour apply it as you usually would. You can topcoat it now with a quick drying topcoat - can you say seche vite? - if you want to but it's not totally necessary.


Leave your basecoat to dry as long as possible, there is going to be tape involved and you want to minimise any chances of the base colour lifting.

I got this nifty little gadget from TKMaxx in their crafty section in the home department.  I was on the search for pretty much this exact size of star but had no joy in hobbycraft, all the punches there were too big.  


I found a UK based website which stocks the Knockout Punch Starter Kit for £8.06 + £3.50 Uk delivery, £7 international delivery.  A bit more than my £4.99 at TKmaxx, so please try there first!
That website has a selection of the Border Punch inserts, here, so you can get lots of different designs, they would be quite cute for maybe a scalloped edged french - I may investigate further! 


Get some Scotch Tape and place it on some baking paper, this makes it much easier to punch the shapes into the tape.  Punch the holes into the tape and when you are ready to use it, left the tape gently off the baking paper.


Place the tape over the nail, pop your polish over the top, give it a few minutes to dry and very gently peel the tape up.  The corners, or points, of the stars are inclined to lift - this is where a cocktail stick can come in handy if you need to do any small 'pinpoint' repairs. 


Hoorah!  I was chuffed with this! It is so simple to do and the tape on the baking paper trick was a revelation!

If you give this, or any nail art a go, I'd love to see it on instagram.  Find me @jodisayswhat 

Hugs,

Jodi
xxx

Monday, 10 February 2014

Protein packed parcels!

I have started trying to eat better and exercise more and so last Saturday, after my early morning step aerobics class, I rustled up some well deserved (I think!)  protein parcels, which were surprisingly filling!


And they look kinda pretty too.


I used three eggs, two would have been enough though, unless you were only using the whites.  Some turkey rashers, tomatoes, spinach and sweet pointed pepper, note I don't actually like pepper but I'm trying . You could add any veg that you want here such as mushrooms etc but I have to admit I'm more of a fruit person, so this does me fine.


Spray oils are a great tool in the kitchen, I use this one cal 'Fry Light' spray to quickly and easily coat my muffin tray.  You could also just line the muffin tray with paper or silicone cases if you don't have spray or  were going for the veggie option and wanted to miss out the next step.  Doing them in cases also makes them a bit more portable too.


I then line the muffin tray with the turkey rashers, I think I used three here and there was a wee bit of a tetris element involved in fitting them all in properly.


I then mixed together the eggs and veg.


And then poured the mixture into the turkey rasher lined tray.  Easy peasy.  I had way too much and really should have made four but I couldn't be bothered trying to fiddle around with the turkey rashers again, I was hungry!!

Don't fill them quite as much as I did as you will see in the next picture that they do puff up a tad! 

While I was doing this, I heated my fan oven up to about 180 degrees.  If using a normal i.e. non fan oven, try about 200 degrees (Celsius). 


I think in the end, I baked mine for about 22 minutes, I had a look at them around 18 minutes and they were still a wee bit wobbly in the middle. 


Loosen them off with a knife, being careful of the hot tin!


And here we are, great little breakfast/brunch/post workout snacks.  Using MyFitnesspal on my phone, I calcualted that all three of these came to approximately 225 calories.  Not bad considering a 30g serving of Special K and 100ml of semi skimmed milk is about 165 calories and doesn't contain one of your five a day.

These can be made in advance and stored in a container in your fridge for about 4 days or so, so great for a power breakfast on the go.      

Do you have a favourite post workout food?

Hugs,

Jodi 
xxx


Sunday, 9 February 2014

Weekend Mani #21

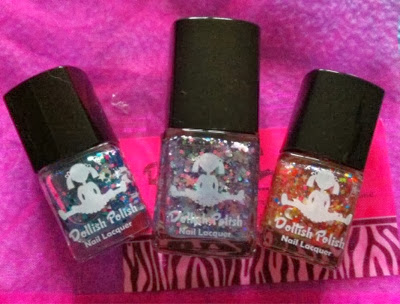
This weekends Mani is pretty much the opening of a whole new portal into my polish collection.  I purchased my first ever Indie polishes.  Indie's are made by independent polish makers who create and sell their wares and they are becoming big news in the nail world.  Things like glitter toppers, thermals and holo polishes are being thought up by these creative souls and being sold on places like Etsy.com, although a fair few indie brands now have proper websites and are run as proper businesses.  The polishes I bought were from Dollish Polish and they are all glitter bombs! 


The one I used this weekend is the full sized polish in the middle called 'Care Bear Stare'.  This is the one that prompted this purchase as I had previously vowed to stay away from indie's for the sake of my bank account.  However, I had been lusting after this one for a while and then saw that it was part of Dolly's restock and knew it would be mine! 


Once again, please excuse the cuticles and lack of clean up, I actually painted my nails at 1am on saturday morning as I was so keen to get this on my tips! Not sure how well you can see it, but the polish has little stars and butterflies in it, there is a butterfly on my ring finger.  Typical glitter + iPhone pic = hard to capture.  this combo is like a princesses dream.   


The base polish I used was part of my Mavala Delicious Collection, which is pretty much my favourtie selection of pastels ever.  It doesn't seem like you can buy the whole collection together anymore but you can buy trios and individuals.  I like Mavala polishes as they are small but not too small bottles.  Ideal for someone like my mum, who doesn't paint her nails too often but likes a pretty polish now and again.


Words fail me at describing this polish.  After using two coats of my Mavala base colour, I applied two coats of this baby.  The first coat, I swiped on as usual and the second coat I went fishing for the bigger particles and dabbed them on my nails.  That is one obstacle when applying such glittertastic polishes, you will have to go fishing for the big bits.
This has small circles, big circles, squares, big hexes, stars and butterflies in gorgeous pastel hues of purple, pink, aqua and silver all in a clear base with some iridescent glitter in it just incase the rest wasn't enough.  


Nev loves nail polish! And nail files and bags and shoes.  He was being a 'right sook' or suck up here as the square bottle was just right for rubbing his face against! 
Few tips for applying glitters like these would be to turn the bottle upside down for a good 10 minutes before application and use a cocktail stick if you want to strategically place any particular pieces, such as the stars or butterflies contained within this one. 

Love my new indies although I don't plan to purchase anymore just yet, I still have to have a good play with these three and explore some colour combos, prepare yourself! These were shipped from the states and did arrive pretty quickly after dispatch but one thing to always be mindful of is if you order from the states, customs may destroy a package containing polishes.

Do you own any Indie polishes?
   

Tuesday, 4 February 2014

Origins Super Spot Remover - A Review

Another product that is highly recommended in the blogosphere and seemed like the answer to my blemish prone prayers is Origins Super Spot Remover.


I have had this for quite a few months now and thought it was about time I gave my two cents!

First up, I feel I should mention the size of the product.  It is a rather small 10ml bottle but actually a little does go a long way.  As it is a gel, it is also easy to control how much product you dispense.  At £14, it is on the pricey side although the Origins website often have free delivery and sample treats, which gives you more of a 'value for money' feel.


The bottle itself if fairly dinky and unobtrusive and I must say, I do like Origins packaging - usually a block colour with clear writing, it just has a 'sciency/clinical' look about it. There is a lot of information on the outer packaging and it is all recyclable - yay!  There's a small hole for dispensing the product and you can apply it using your fingers but a cotton bud is advised.


With Salicylic acid to aid healing by way of increasing skin cell turn over and thus acting as an exfoliator, this claims to banish spots and heal the skin.  One point I noted is that alcohol is further up the ingredients list than salicylic acid.   Also contained within your 10mls is witch hazel, which is an astringent and when paired with alcohol can be quite drying on the skin.  And lastly of note is caffeine, I had to read up on this as they (Origins) say that caffeine calms the redness and I got really confused as I have always thought of caffeine as a stimulant and thought it would increase blood flow but apparently, I was totally wrong! caffeine acts as a vaso constrictor which means it constricts the tiny blood vessels that would usually bring the blood and therefore redness to the face.  Learn something new everyday!


My honest opinion is that this did absolutely nada for my blemishes, which is disappointing as the first line in the description of this product reads 'Red PMS blemish? Bad joke breakout? Heal, fight and fade it fast'.  Unfortunately for me, it has not fulfilled any of those claims.  I find that my blemishes are still as red and as painful as before I apply this and even when I use the tiniest of amounts, I find it dries the skin over the blemish making it rather (more) unsightly to boot.  This forms a wee gel layer over the blemish to hopefully block any dirt or bacteria getting into the pores but I find this makes it look even more crusty! Especially under make-up.
On smaller spots, the effects are negligible and I would suggest perhaps trying a 'Witch Stick' first as they are definitely cheaper.  On the bigger, hormonal acne type spots, this just made them look worse and harder to cover up.

Do you have a Holy Grail spot product?

Hugs,

Jodi
xxx