Showing posts with label pastel. Show all posts

Sunday, 9 February 2014

Weekend Mani #21

This weekends Mani is pretty much the opening of a whole new portal into my polish collection.  I purchased my first ever Indie polishes.  Indie's are made by independent polish makers who create and sell their wares and they are becoming big news in the nail world.  Things like glitter toppers, thermals and holo polishes are being thought up by these creative souls and being sold on places like Etsy.com, although a fair few indie brands now have proper websites and are run as proper businesses.  The polishes I bought were from Dollish Polish and they are all glitter bombs! 
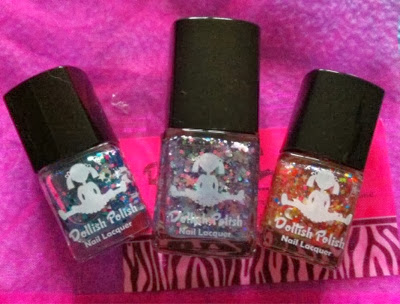

The one I used this weekend is the full sized polish in the middle called 'Care Bear Stare'.  This is the one that prompted this purchase as I had previously vowed to stay away from indie's for the sake of my bank account.  However, I had been lusting after this one for a while and then saw that it was part of Dolly's restock and knew it would be mine! 


Once again, please excuse the cuticles and lack of clean up, I actually painted my nails at 1am on saturday morning as I was so keen to get this on my tips! Not sure how well you can see it, but the polish has little stars and butterflies in it, there is a butterfly on my ring finger.  Typical glitter + iPhone pic = hard to capture.  this combo is like a princesses dream.   


The base polish I used was part of my Mavala Delicious Collection, which is pretty much my favourtie selection of pastels ever.  It doesn't seem like you can buy the whole collection together anymore but you can buy trios and individuals.  I like Mavala polishes as they are small but not too small bottles.  Ideal for someone like my mum, who doesn't paint her nails too often but likes a pretty polish now and again.


Words fail me at describing this polish.  After using two coats of my Mavala base colour, I applied two coats of this baby.  The first coat, I swiped on as usual and the second coat I went fishing for the bigger particles and dabbed them on my nails.  That is one obstacle when applying such glittertastic polishes, you will have to go fishing for the big bits.
This has small circles, big circles, squares, big hexes, stars and butterflies in gorgeous pastel hues of purple, pink, aqua and silver all in a clear base with some iridescent glitter in it just incase the rest wasn't enough.  


Nev loves nail polish! And nail files and bags and shoes.  He was being a 'right sook' or suck up here as the square bottle was just right for rubbing his face against! 
Few tips for applying glitters like these would be to turn the bottle upside down for a good 10 minutes before application and use a cocktail stick if you want to strategically place any particular pieces, such as the stars or butterflies contained within this one. 

Love my new indies although I don't plan to purchase anymore just yet, I still have to have a good play with these three and explore some colour combos, prepare yourself! These were shipped from the states and did arrive pretty quickly after dispatch but one thing to always be mindful of is if you order from the states, customs may destroy a package containing polishes.

Do you own any Indie polishes?
   

Wednesday, 26 June 2013

Pastels and Polka Dots!

Hey Chummers!

This weekend in Aberdeen was really quite grey and wet and miserable, so I decided on Sunday that I was going to bake a cake with a difference after being inspired by this blog post.  I didn't read the blog post until a bit later but the image of the cake popped up on my facebook page and thought it would add just the right amount of colour into my weekend!

I would like to point out that my cake did not turn out as intended but it was still yum, so a win really! Haha!

I started by making the batter from my coconut recipe as detailed here, this was going to be for my coloured cake balls.


I then split the mix into five seperate bowls, added some food colouring and mixed it well in.


I didn't have a cake pop baking tray so I thought I would just make individual cupcakes and trim them to size, so I used my pastry/basting brush to grease a baking tray with butter and then threw sifted flour over it. You can buy the silicone cake pop trays off of the likes of ebay and amazon pretty inexpensively.


I divided the mixture into the baking tray using an ice cream scoop.


How pretty does that baking tray look!! haha!

I baked them for about 15 minutes, until a cocktail stick stuck in the centre came out clean.

While they cooled, I made the buttercream icing, again like the one for the coconut cake (without the coconut) and added a teaspoon each of vanilla essence and blue food colouring - my other half picked the blue!


I used the excess batter to make a wee rainbow layered heart cake for the Mr.

This is where I forgot to take pictures, silly me! I trimmed the cupcakes down to kinda ball shapes but was a little bit gutted that the colours were not very vibrant, the blue looked green, the green looked yellow, the purple looked pink, the pink all rose to the top and the yellow wasn't even visible!

I made a vanilla sponge batter, which is just the coconut sponge recipe without the coconut and a teaspoon of vanilla extract.  I put a thin layer over the bottom of a greased and floured cake tin.  I used a square one as I thought it would be fun against the circles in the cake, but a 9"/20cm round sandwich tin would be fine.


On top of the thin layer, I placed the cupcake balls and then poured the rest of the batter over the top making sure that each ball was well covered.

I put it into the oven at 180 degrees C (fan assisted) for about 30 minutes - again, keep checking with a cocktail stick on knife, when you stick either one of those in the centre, they should come out clean, if they come out and they have mixture on them it means that it is not cooked through the middle.

Et Voila!!


Leave for 5 minutes in the tin to cool but do take a knife round the edge to loosen the sponge.  After this, place on a wire cooling rack until completely cool and then decorate 'til your heart is content!

I hope you like and that this maybe inspires you,

Do you have any recommendations of vibrant food colourings?

Hugs,

Jodi 
xxx