Showing posts with label Barry M. Show all posts

Friday, 27 December 2013

Weekend (ish) Mani #18 and a How To!

Merry Day After Boxing Day!

Have you had a look at the boxing day sales yet? I've ordered a few bits and bobs and so will post about them very soon!

My Christmas Day Mani was a bit of a quickie one, we were doing the cooking and prep etc for 11 or so people and so it was very, very busy!

I have made this into a wee tutorial type post too, since it's Christmas and all that jazz!

I have a multitude of different pictures too as my iPhone storage is kinda full and I still haven't figured out how to work my coolpix that I got for my birthday in July!


This mani was pretty simple, I was rather rushed and this was the only thing I could think of that didn't require too much effort (or thought!) on Christmas Day.


Here's the tools I went for: a selection of polishes, a topcoat, thread, scissors, dotting tool and a plastic tray thing for splodging my polish into.


After I applied my basecoat, I applied two coats of OPI 'I vant to be a-lone star, I love this for this particular mani as it is a frosty pale blue with a silver shimmer.  Some of my nails needed a third coat as there were some patchy bits.

Before adding the second coat, I cut the thread to size in preparation for the next step.


After adding the second (and third) coats of polish, I applied the thread to my nails before the polish was dry.  you can apply it in anyway you want, I quite like the loop on my pointer finger!

Use tweezers or the scissors to gently push the thread into the polish so that it adheres to the nail. 

I then applied a coat of topcoat just to seal it all in.

One thing I did forget which would have been really handy for while doing my dots would have been a cotton pad with nail polish remover on it to wipe my dotting tool on after each colour.


I then splodged my polish into the plastic tray, I started with yellow and did all the yellow dots on every finger before moving onto all the blue dots, then all the red dots and then all the green. 

The yellow I used was the Barry M Limited Edition Yellow I posted about here.


The blue I used was Nails Inc. 'Baker Street' quite possibly the bestest blue colour in the world ever!! I posted about it here too.


The red I used was the Mavala Rouge Rubis one I used last week, here, is a lovely little red.  I can't believe I have owned this for a whole year before using this, it really is a lovely, sparkly red and perfect for Christmas!


The green was a cheeky little poundland purchase but I really like the metallic effect.  It is a Sally Hansen Ultra HD in shade 'Resolution'. I have only ever worn this on my toes and although the colour is pretty lovely, the formula is quite thin and needs quite a few coats for opacity. 


I waited (not so) patiently for the polish to dry, trimmed the thread and then topcoated again just to keep it looking nice and shiny throughout christmas dinner!

This design could have so many variations, you could do a darker base or a glittery base, switch up the colour of the thread and silver and gold dots would make awesome fairy lights! 

Let me know if you give these a try, these would work well for New Years Nails too!


Hugs,

Jodi


Monday, 16 December 2013

P...p...paint on a Penguin!!

Okay, totally lame title but hey, it's Monday!

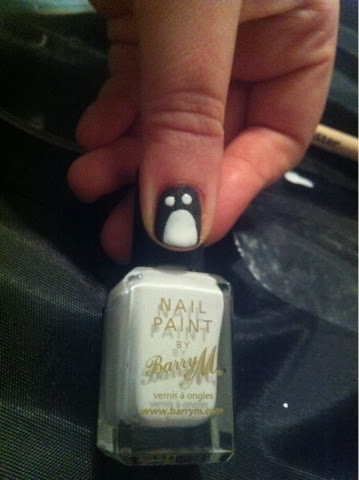
Here's a quick guide to how I did my penguin nail at the weekend...


I used a Catherine Arley Black Holo, I had never used it before and thought the holo would be quite fun but in actuality (is that a word?!) it wasn't very holo! Its a good enough polish but not very easy to get hold of and personally, I wouldn't bother.  Sidenote: If you are really keen on a holographic polish then could I recommend you check out iconic effect as they have a superb holo topcoat and you can pick the intensity, all the swatches I have seen look amazing and it means you can holo all your fav colours you already own! Squeeeee!!


Back to the nails, once you have painted your base colour, which doesn't have to be black btw, if you want a pastel pink penguin, you go ahead and paint that pastel base right on!  Get yourself a dotting tool or kirby grip and dab it in the colour you have chosen for your eyes and tummy.  I'm using the plastic top off of a Whiskas Dentabits container to splodge my polish into, pringles lids are also excellent.  I have a bundle monster set which contains quite a few tools but I only really use the dotters.  You can pick up dotting tools on Amazon and eBay really cheaply and Bourjois also do one although I am not quite so sure how widely available that is.  For my little guy's bits, I'm using the old faithful, Barry M Matte White. 


Do two relatively big eye splodges, you can be as symmetrical or asymmetrical as you like here, asymmetry just adds character...right...I find it is best to put fresh polish on the dotter for every dot or dab.


Draw on your little dudes tummy, again, it's upto you if you want a fatty penguin or not.  I did a kinda fatty one purely because that is the best of my artistic abilities.


Next, get your black and splodge a bit on your polish receptacle i.e. plastic lid and, using the smaller end of the dotter or kirby, apply a dot into the centre of your white eye 'splodges'.


I have yet to get this bit symmetrical and it always reminds me of those googly eyes you used to get on cards as a kid! Like I say, character!! 


Next up, we need to give this badboy some features.  I used an orange Revlon polish called 'Siren' for the first time, seemed pretty good although it was a bit runnier than the other two.  If you had your heart set on penguins of this colour scheme, best thing to do would be to go to Boots or Superdrug and take advantage of the 3 for 2 offers running on the likes of Barry M and Sinful Colours. 


I digress... Using the bigger end of the dotting tool, I used one dot of the Revlon Polish for each 'foot' or is it flipper? and then used the smaller end to dot a wee (kinda) triangle for his beak.

ét Voila!! 

It's now upto you if you want to get really arty and draw on scarves and what not, just bear in mind that you will need to also paint the same on your dominant hand with your non-dominant hand. 

Make sure you let each coat dry a little and DO NOT put topcoat over until it is completely dry as it will inevitably smudge your little guys eyes and the orange from his beak will be on his tummy and you will be sad!!! 

Hope you give this a go!

Hugs,

Jodi
xxx

Sunday, 17 November 2013

Weekend Mani #13

Happy Weekend Peeps!

Sorry I have been a bit lax on the ol' blogging horse this week, winter has hit me right in the motivational mojo! 

This weekend the sun was shining for what is claimed to be the last 'fine' weekend this year, the mercury rose into double figures!! 

Following how much I enjoyed the contrast between the red and black last week for this mani, I thought I would go down a similar path this weekend.

I present to you Barry M 'Spring Green'...


This is a lovely bright green, which is really cheery and although I'm not usually a fan of green, I love this! As I have come to expect from Barry M, the formula is great, 2 coats gives opacity and the brush is really easy to use.  I actually picked this one up in SemiChem, that is far too handy as it's just five minutes walk away from my house! 

'Spring Green' jazzed up with O.P.I. Black Shatter...


Now, before you say 'not another O.P.I!' this was only one shiny pound from Poundland! £1! The formula on this was great, I've tried a few shatters or crackle polishes and often find they can be a bit weak or a bit wishy washy but this was a good, solid colour and dried into it's shatter super quick.  
This is from the Katy Perry O.P.I collection.

If you are a fan of shatter polishes, I would heartily suggest visiting the pound shop as I have picked up a purple, gold, black, red and green one over the past couple of months!

Have you tried shatter or crackle polishes?

Are you a fan of Barry M polishes?

Hugs,

Jodi 
xxx

P.s Boots and Superdrug both have a 3 for 2 across cosmetics on just now! 

Wednesday, 16 October 2013

Eye eye Barry!

Last month I bought this Barry M eyeliner brush from Superdrug for £2.99, I actually bought it for filling in my eyebrows rather than using it as an eyeliner brush. 

 Honestly, it's great! 

It has an angled tip and a long tapered handle, the bristles themselves are extremely soft and the brush picks up the product easily.  


The back of the packaging really stood out to me as it actually gives you a web address and an app option to go to to get make up tips and tutorials.  


The tip of the brush is very thin which allows for precision.  It can be used wet or with gel liner for a more intense line or with eyeshadow for a more subtle, smokey look.


I find the longer handle gives me more control over what I am doing with the brush and allows me to create a more natural shape.  I like to use this brush with my HD Brows palette as I find using a powder helps me to avoid the 'Scouse Brow' look - Aberdeen isn't ready for that yet, I think!


I also like the colour, the range is all very colourful and cheery. And extremely easy on the purse.

If you are just starting out with make up or if you are expanding your collection on a budget, I urge you to check this range out, I certainly will be! 

Have you tried any of Barry M's new brushes?

Have you seen the other new products in Barry M's range?

Hugs,

Jodi
xxx


Sunday, 1 September 2013

Weekend Mani #2

The Sun has made an appearance this weekend and so I fancied a nice, cheery nail to celebrate! 

You may remember that very recently I made some Barry M purchases, I posted about them here.  I have used the matte white as a base on my accent fingers, O.P.I Shorts Story (please do shop around for this!) for the other nails and some polka dots and the Ltd Edition yellow by Barry M for some extra dots.  I do like polka dots! 


Application was easy breezy, I used Sally Hansen 'hard as nails' as a base coat and two coats of the base colour on each nail.  I'm not really too fussy about base coats etc at the moment as my nails only have to last two days at the weekend, I like the Sally Hansen one as it's actually really easy to pick off, tut tut! 


To jazz things up a bit, I decided to try a matte finish.  This is just a cheapie I got from George at Asda. It's not great and if the polish is applied too thickly, it doesn't really go particularly matte.  As I say, I only wear this for two days and so can't really comment on durability.  I would also imagine it is harder to wrap the tip of the nail with a matte polish.  That's maybe an idea for a future post! 


Are you doing anything nice this weekend?

What is your 'go-to' nail art? 

Hugs,

Jodi
xxx

P.s. please excuse the cut on my thumb, whoever thought a double edged serrated bread knife was a good idea has a lot to answer for! 

Sunday, 18 August 2013

A trio of Barrie's ...

Hey Chummers!

I couldn't go into Boots and not come out without a polish (or three) *chortle*

Pictured below is the white, ltd edition yellow (only available at boots) and the pink sequin effect. I really like the ltd edition cap, it just makes it look so much more edgy.


Below we have two coats of white on the index (pointer) finger and one coat of the yellow and the white on the following fingers.

Next up we have the two coats of the pink sequin effect over the white to give it a bit of oomph, two coats of the yellow on its own and one coat of yellow over the white.


Two things stood out for me that I did not like about these purchases, firstly, if you are testing a nail polish in a shop, please do it neatly and cleanly! In the picture below, just at the top, you can see a bit of dried up yellow polish, the lid was practically crusted on - eugh! 
Secondly, the sequin effect polish.  The formula was terrible if I'm brutally honest, the base pink was grainy and the colour itself was wishy -washy, it was not good to work with.  It also had a textured finish.  On the second coat I found that the base colour covered a fair few of the 'sequins' from the first coat giving them a much less vibrant effect.  I was gutted by this polish as I had really liked the look of it when it was first released.


The iphone pic below isn't the best, however this is two coats of the sequin effect polish, just look how patchy and meh the finish is! 


The formula of the white and the yellow polish were pretty good, if applied very carefully you could reach opacity in two coats, or if done not so carefully (like me!) you would benefit from three.

Whats your feelings on all these new textured polishes?

Hugs,

Jodi
xxx


Saturday, 3 August 2013

Another trip to Boots!

I really should be banned from that shop!

I went in to get a white nail polish and spent about 31 shiny pounds!  

Here's my purchases...


I couldn't resist the Barry M as it was a 'spend £6 and get a free ltd edition bottle' deal and I was getting the white anyway.  I got the sequin effect in pink as I have been wanting to try these for ages and so I got the yellow limited edition one free! Yay!  I will review this in a separate post very soon! 


I got the radox as it was only £1 and I love the smell of this one and so does my other half.  I wouldn't say the scent lasts particularly well on the skin,  it it makes our flat smell nice whilst the bath is running. To quote my man 'if pink were a smell, that would be it!'

I was going to a wedding the next day and so was looking for a good tanner that wasn't too expensive.  I came across this No.7 'perfectly bronzed' and it was buy one get one free on their suncare and tanning and so I picked up the anti-ageing sun protection spray in SPF 30.


The Soap & Glory 'night in shining armour' was in the clearance section for £3.25 when it's usually £13! I've seen some good reviews of this product with regards to helping even out skintone and replenish moisture (particularly helpful in this warm weather that I keep harping on about!).  I used it for three nights and on the first day after I would say I felt my skin was softer and my make up sat better however after the third day I have had quite a few (7 12!) spots pop up all over my face :-( .  Now, this may be nothing to do with the cream, I only put on a light layer and I have been having spotty chin issues lately but these appeared on my chin, cheeks, temples and even the top of my nose! I'm going to wait until these painful pests go away and I will try the cream again. 


Do you use a night cream?

Do you go into a shop for one thing and come out with 7? And a bored looking other half?! 

Hugs,

Jodi
xxx

Tuesday, 21 May 2013

Is it orange? Is it pink? Is it red?

Hey Chums,

We have started getting sunshine here in the North East! Yayayay! I hope you are too, wherever you may be!

I love that no matter how casual and comfy you dress, having your nails done can really lift your spirits.  It's during these summer months that I love wearing coral nail polish, it can look a variety of different colours in a day. It can look red but then the sun can hit it and the orange leaps through, it keeps your hands looking classy but with an edge AND I have yet to see a skintone that doesn't suit it!

I only have two coral nail polishes but I like them so much that I don't feel the need to go out hunting for more (although there are some gorgeous lighter coral ones on the go just now from Barry M and Maybelline and Rimmel, haha, maybe I will end up buying more!)


Essie's Peach Daiquiri in the shade (trying to be a bit artsy on instagram!)


Barry M Coral in sunlight at the beach! :-)


The two as neighbours

The Peach Daiquiri by Essie is leans more towards the pink end of the coral spectrum whereas the Coral Barry M is definitely more orange-y red.  Both are lovely and the formulas are great.  Although I'm a huge devotee to O.P.I, I have quite small nails and the Barry M and Essie brushes are easier to use for me.

I hope you enjoyed these comparisons and it has spurred you to go get some happy hands!!

Hugs,

Jodi 
xxx